
Health views
The Health section at the bottom of the sidebar lists the problems the app found in your library, each with a live count:
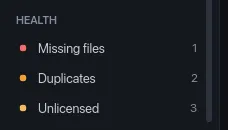
| Row | Counts | Click it to |
|---|---|---|
| Missing files | Assets whose file is gone from disk | Show only those assets in the grid |
| Duplicates | Groups of identical files | Open the Duplicates review |
| Unlicensed | Assets with no pack and no license file | Open the License fixer |
A row with nothing to fix is dimmed, shows 0 and says “Nothing to fix” when you hover it. Otherwise its colored dot stays lit until the count reaches zero. The counts update after every scan, after each watch check when file watching is on, and right after you fix something.
None of the counts include archived assets.
Missing files
Section titled “Missing files”An asset is missing when the library still lists it but its file is no longer where the library expects it. That happens when you delete, move or rename a file outside the app, or when a whole library folder is unreachable (an unplugged drive, a renamed folder). The app only notices at the next scan of that folder: a rescan, a watch check or Scan all roots in the command palette. The status bar reports how many files the scan marked missing.
Missing assets are hidden from every other view: All assets, search, folders, types, tags and collections. To see them, click Health → Missing files, pick Add filter → Missing files in the grid toolbar, or run Show missing files from the command palette. A missing files chip appears above the grid; click its × to go back. If there’s nothing missing, the grid says “No missing files”.
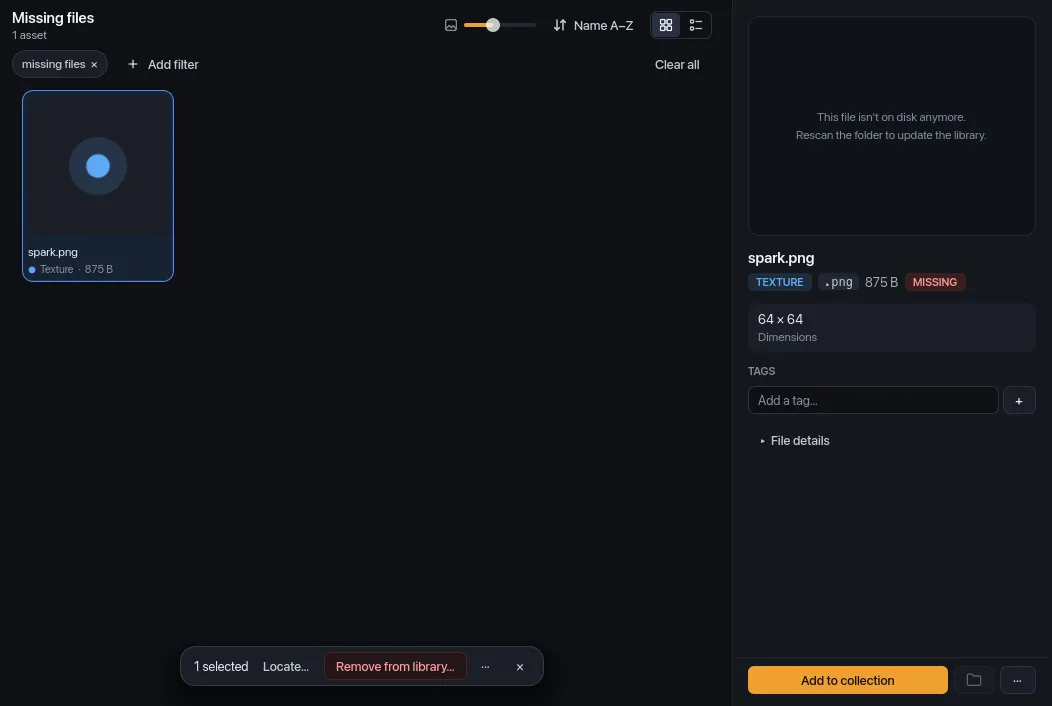
When you select a missing asset:
- The inspector shows a red MISSING badge and, instead of a preview, “This file isn’t on disk anymore. Rescan the folder to update the library.” Its name, tags, collections and pack info are all still there.
- Reveal in Finder (Explorer on Windows, file manager on Linux) is turned off.
- In the Missing files view, the selection bar appears as soon as one asset is selected and offers two actions instead of Rename and Archive:
Locate… (one asset at a time) opens a file picker. Choose the file’s new location and the asset points at it again, keeping its tags, collections and pack. The file has to be inside one of your library folders; otherwise the status bar says “Locate: Pick a file inside one of your library folders.” If another asset already points at that file, you get “That file is already in the library.” The file is hashed again at the next scan.
Remove from library… drops the selected assets from the catalog. The confirmation says how many tags and collection memberships they lose. Files on disk aren’t touched (they’re already gone). You can undo it with Cmd/Ctrl+Z until you quit; see Bulk actions and undo.
If the file comes back (you plug the drive back in, or move the folder back), the next scan clears the missing flag on its own. Nothing is lost in the meantime.
Duplicates
Section titled “Duplicates”How duplicates are found
Section titled “How duplicates are found”After every scan, the app runs a hash pass that computes a SHA-256 checksum of each new or changed file. Two files with the same checksum have identical contents, whatever their names. Duplicates counts the groups of two or more such files.
- A file only counts once it has been hashed, so a group can take a moment to appear after a scan finishes.
- Missing and archived assets are left out.
- Files you’ve already replaced with a link (below) no longer count.
- Files inside archives aren’t compared; a
.zipcounts as one file.
The Duplicates review
Section titled “The Duplicates review”Click Health → Duplicates, or run Find duplicates from the command palette. The review replaces the grid until you click Close or press Esc. Clicking anything else in the sidebar, a filter chip or search also takes you back to the grid.
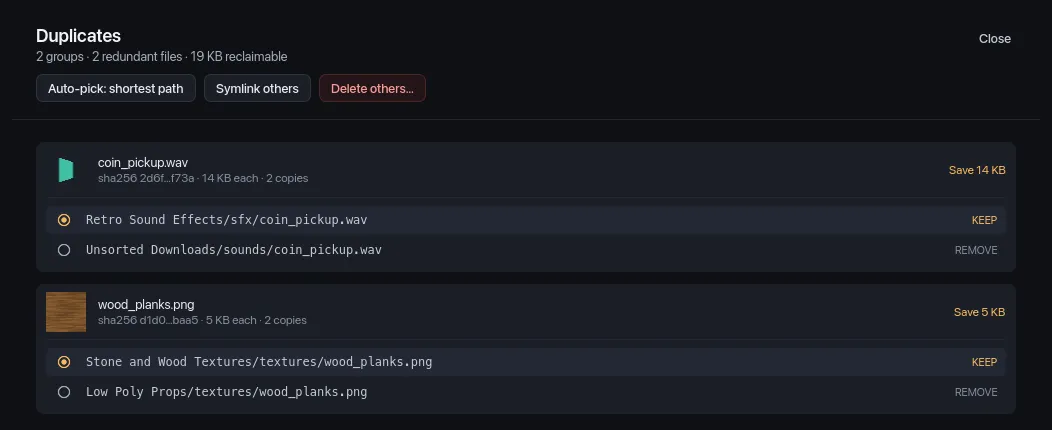
The summary line says how many groups there are, how many redundant files they hold and how much space you’d get back. Each group is a card with:
- a thumbnail, the file name, the start and end of its checksum, the size of one copy and the number of copies,
- Save and the space that resolving this group frees,
- one row per copy with its path (prefixed with the library folder’s name when the copies are in different folders). Hover a path to see the full location.
Groups are sorted by the space they’d free, largest first. The review shows the 100 largest groups at a time; resolve those and the next ones appear.
Choosing which copy to keep
Section titled “Choosing which copy to keep”Every group starts with the copy that has the shortest path marked KEEP; the others say REMOVE. Click a row (or its radio button) to keep that copy instead. Auto-pick: shortest path resets every group to the shortest path again.
Resolving the groups
Section titled “Resolving the groups”Both actions apply to every group in the review at once, and only touch the copies marked REMOVE. Each asks for confirmation first, with the number of files, groups and the space freed.
| Button | What happens to each REMOVE copy | In the library |
|---|---|---|
| Delete others… | Moved to the Trash (Recycle Bin on Windows) | Its asset is removed, with its tags and collection memberships |
| Symlink others | Moved to the Trash and replaced with a symbolic link to the kept copy | The asset stays, at the same path, and stops counting as a duplicate |
Symlink others keeps every path working (useful when a project or another tool expects the file in both places) while storing the data once. It isn’t available on Windows.
Neither action can be undone in the app. The confirmation says so, and Cmd/Ctrl+Z afterwards only tells you where the files went. To undo, restore the files from the Trash and rescan. The status bar reports the result, for example “Duplicates: 2 moved to Trash, 0 errors”. A copy that couldn’t be moved to the Trash counts as an error and stays as it was.
When no duplicates are left, the review says “No duplicates”.
Unlicensed
Section titled “Unlicensed”Unlicensed counts assets with no pack and no license file the app could
find, the ones a CREDITS.md would list under “No License Detected” when you
export. Clicking it opens the
License fixer, which groups them and lets you assign a
pack, a license or mark them as your own. The
Fix missing licenses tutorial walks
through it.
See also
Section titled “See also”- Clean up library health, a step-by-step tutorial
- Bulk actions and undo
- Library and scanning